 Save
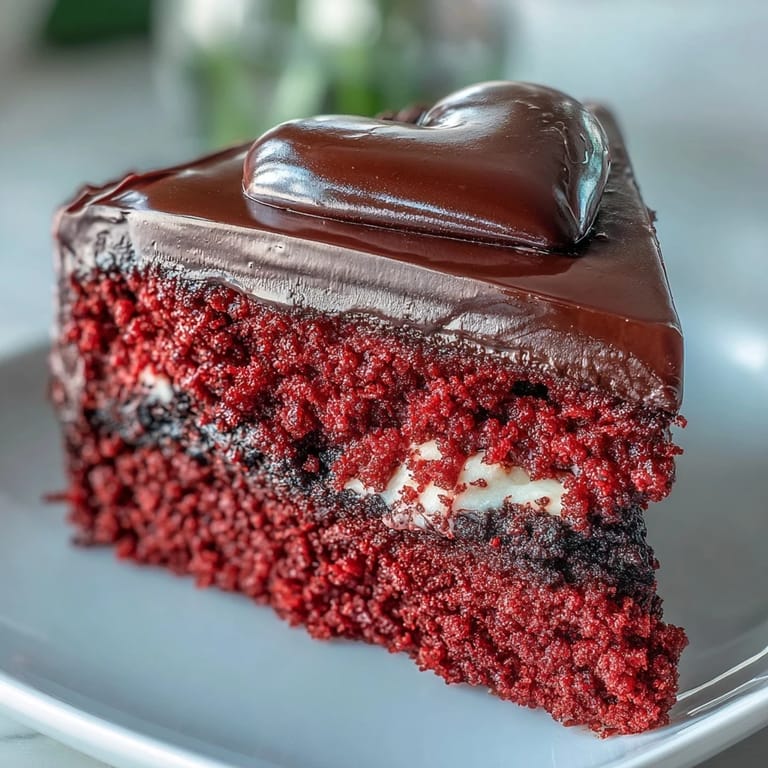
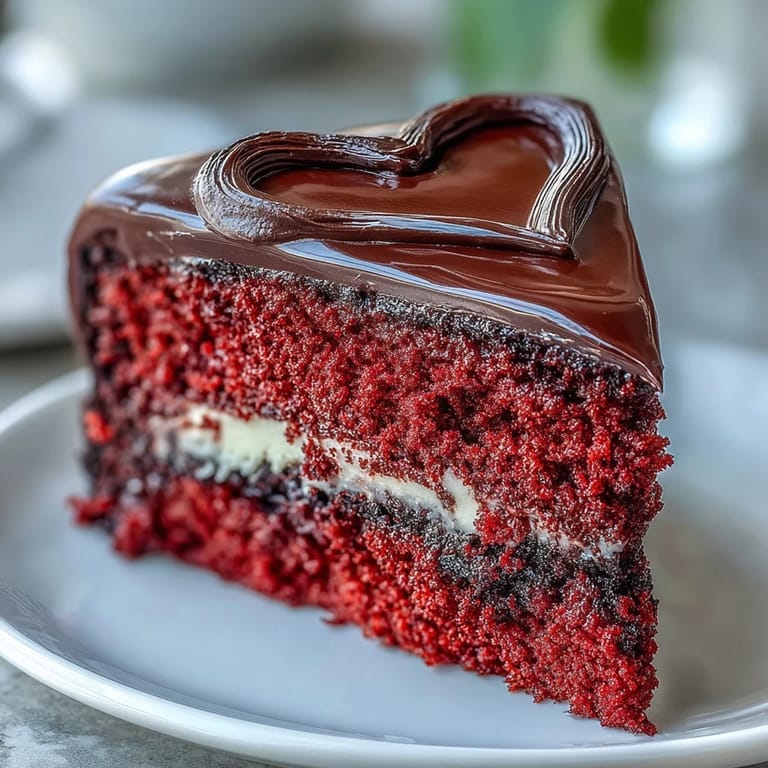
Save Soft red crumb and velvety cream cheese frosting meet a crisp dark chocolate Betty Boop silhouette, creating a playful contrast of textures and a burst of sweet-tangy flavor in every bite. This heart-shaped dessert is as visually striking as it is delicious, making it the perfect centerpiece for a themed celebration.
Save Combining classic American baking traditions with retro artistic flair, this cake is more than just a dessert; it is a statement piece. The vibrant red interior hidden beneath the smooth frosting offers a delightful surprise for anyone lucky enough to get a slice.
Ingredients
Tired of Takeout? 🥡
Get 10 meals you can make faster than delivery arrives. Seriously.
One email. No spam. Unsubscribe anytime.
- For the Cake
- 2 ½ cups (312g) cake flour, sifted
- 2 tablespoons natural unsweetened cocoa powder
- 1 ½ teaspoons baking powder
- ½ teaspoon baking soda
- ½ teaspoon fine sea salt
- 1 cup (224g) unsalted butter, room temperature
- 1 ¾ cups (350g) granulated sugar
- 4 large eggs, room temperature
- 1 cup (240ml) buttermilk, room temperature
- 2 tablespoons red gel food coloring
- 2 teaspoons pure vanilla extract
- 1 teaspoon white vinegar
- 1 teaspoon distilled white vinegar (to activate baking soda)
- For the Cream Cheese Frosting
- 1 cup (240g) cream cheese, room temperature
- ½ cup (112g) unsalted butter, room temperature
- 4 cups (480g) powdered sugar, sifted
- 1 tablespoon pure vanilla extract
- Pinch of salt
- For the Betty Boop Silhouette Decoration
- 6 oz (170g) dark chocolate or candy melts, melted
- Parchment paper
- Betty Boop heart-shaped stencil
Instructions
- Step 1
- Preheat oven to 350°F (175°C). Grease two 9-inch (23cm) heart-shaped cake pans and line the bottoms with parchment paper.
- Step 2
- In a medium bowl, whisk together cake flour, cocoa powder, baking powder, baking soda, and sea salt. Set aside.
- Step 3
- In the bowl of a stand mixer fitted with the paddle attachment, beat the butter on medium speed for 1 minute until creamy. Gradually add sugar and continue beating for 2–3 minutes until light and fluffy.
- Step 4
- Add eggs one at a time, beating on low speed after each addition just until blended. Scrape down the bowl sides as needed.
- Step 5
- Stir in red gel food coloring, vanilla extract, and white vinegar until the batter is evenly colored.
- Step 6
- With the mixer on low, add one-third of the dry ingredients, then half of the buttermilk, mixing just until incorporated. Repeat with another third of dry ingredients, remaining buttermilk, and finish with the last third of dry ingredients. Do not overmix.
- Step 7
- In a small cup, combine 1 teaspoon vinegar with baking soda, then gently fold into the batter. The mixture will foam slightly—this creates a light crumb.
- Step 8
- Divide the batter evenly between the prepared pans, smoothing the tops with an offset spatula. Bake on the center rack for 25–30 minutes, or until a toothpick inserted in the center comes out clean.
- Step 9
- Let cakes cool in pans for 10 minutes. Run a thin knife around the edges, then invert onto wire racks and remove parchment. Cool completely before frosting.
- Step 10
- While the cakes cool, make the cream cheese frosting: In a clean mixer bowl, beat cream cheese and butter on medium speed for 2 minutes until smooth. Gradually add powdered sugar and a pinch of salt, then vanilla extract, beating on low until combined and fluffy. Transfer to a piping bag or keep covered in the fridge until ready.
- Step 11
- If desired, level cake domes with a serrated knife. Place one heart cake layer on a cake board or plate. Pipe or spread an even layer of frosting (about ¾ cup) over the top. Top with the second cake layer, press gently, and refrigerate for 15 minutes to set the crumb coat.
- Step 12
- Apply a thin crumb coat of frosting over the entire cake. Chill for another 10 minutes, then add a final smooth layer of frosting. Use an offset spatula to create swirls or leave smooth as desired.
- Step 13
- Prepare the Betty Boop silhouette: Place the printed stencil under a sheet of parchment. Pipe or brush melted dark chocolate over the outline on the parchment. Allow the chocolate silhouette to fully set at room temperature or in the refrigerator for 10 minutes.
- Step 14
- Carefully peel the chocolate silhouette from the parchment and lift it onto the center of the cake. Press gently so it adheres to the frosting.
- Step 15
- Decorate the cake edges with additional frosting rosettes, edible glitter, or red sugar pearls. Chill the cake for 30 minutes before serving to let the frosting set. Slice with a warm, clean knife for neat hearts.
Zusatztipps für die Zubereitung
Using room-temperature ingredients is crucial to ensuring a smooth batter and an even rise in the oven. When finishing the cake, you can store leftovers covered in the refrigerator for up to 4 days to maintain freshness.
Varianten und Anpassungen
For the most vibrant red color without altering the consistency of your batter, always use gel-based food coloring. For a different look, you can swap the dark chocolate silhouette for white chocolate dyed black with oil-based coloring to provide a brighter contrast against the white frosting.
Serviervorschläge
To achieve professional, clean edges when serving, slice the cake with a warm, clean knife. Enhancing the final presentation with frosting rosettes, edible glitter, or red sugar pearls along the edges adds an extra touch of elegance to the heart shape.
 Save
Save With its striking silhouette and classic flavor profile, this Red Betty Boop Heart Cake is a celebration of both style and taste. Enjoy every decadent slice of this nostalgic treat!
Recipe FAQs
- → Can I use a round cake pan instead of heart-shaped?
Yes, two 9-inch round pans work perfectly. Adjust baking time as needed and check doneness with a toothpick at 25 minutes.
- → What makes this cake red without tasting like chocolate?
Gel food coloring provides the vibrant red hue, while just 2 tablespoons of cocoa powder adds subtle depth without overwhelming chocolate flavor.
- → How do I prevent the chocolate silhouette from breaking?
Let the melted chocolate fully set before peeling from parchment. Work in a cool room and handle gently. Thicker chocolate lines are more durable.
- → Can I make this cake ahead of time?
Absolutely. Bake layers up to 2 days ahead, wrap tightly, and refrigerate. Frost and decorate the day of serving for best results.
- → Why add vinegar to the batter?
Vinegar reacts with baking soda to create lift and a tender crumb. It also enhances the red color and adds subtle tanginess that complements the cream cheese frosting.
- → What if I don't have buttermilk?
Make a substitute by adding 1 tablespoon white vinegar or lemon juice to 1 cup whole milk. Let stand 5 minutes before using.