 Save
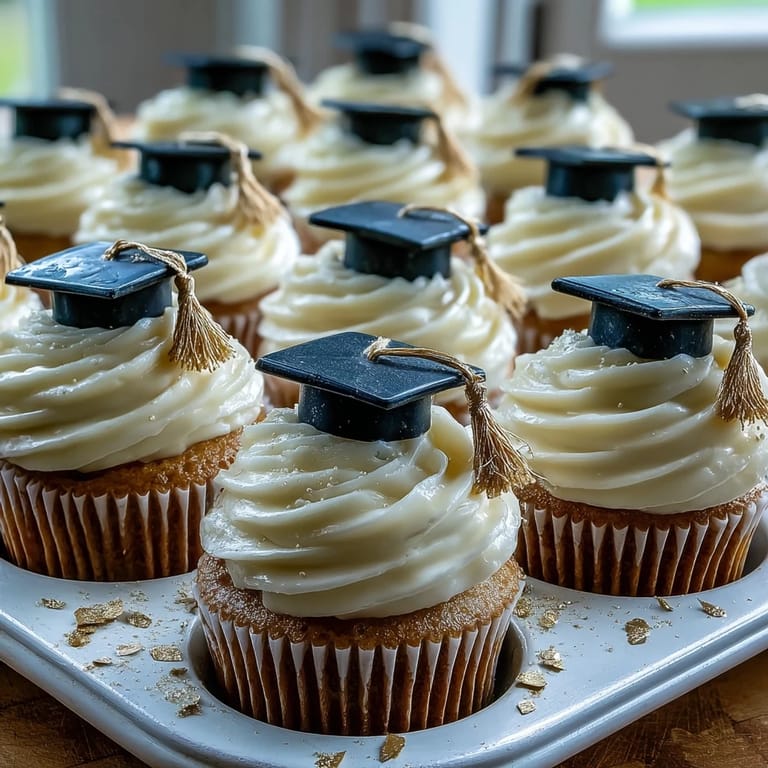
Save Some recipes burst onto the kitchen counter with confetti and the scent of anticipation, and these graduation cupcakes do just that. I remember listening for the ping of the oven as a gentle chorus to the laughter coming from the living room, where everyone was busy signing homemade graduation cards. Vanilla, butter, and just a hint of sugar filled the air, each aroma promising a memory in the making. I'd carefully knead fondant while stealing glances at the celebration decorations shimmering on the table. There is something satisfying about transforming simple ingredients into a tribute worthy of accomplishment.
When my cousin finally received her diploma, I roped her into helping pipe the buttercream swirls before guests arrived. We spent half the time giggling over crooked fondant caps and shading gold tassels until our fingers glistened. She still talks about how the act of decorating together felt like a second, secret celebration after all the speeches and applause.
Ingredients
- All-purpose flour: Sift it first for fluffier cupcakes—the difference in texture is dramatic if you skip that step.
- Baking powder: Accurate measurement is key; too much and you risk a sunken center.
- Salt: Just a pinch; it brings out the vanilla’s warmth and rounds off sweetness.
- Unsalted butter (for both cake and frosting): Let it fully soften; cold butter refuses to cream smoothly.
- Granulated sugar: I love the shimmer it gives when you beat it with butter, and it creates such a light crumb.
- Eggs: Room temperature eggs mix effortlessly into your batter for tender cupcakes.
- Vanilla extract: Opt for real extract if you can—its deep aroma sets the tone for the whole dessert.
- Whole milk: Adding this slowly prevents your batter from splitting; patience helps here.
- Powdered sugar: Always sift to avoid lumpy frosting; no one wants bites of sugar dust.
- Cornstarch (for rolling fondant): Sparingly use it to stop stickiness—you don’t want it changing the fondant texture.
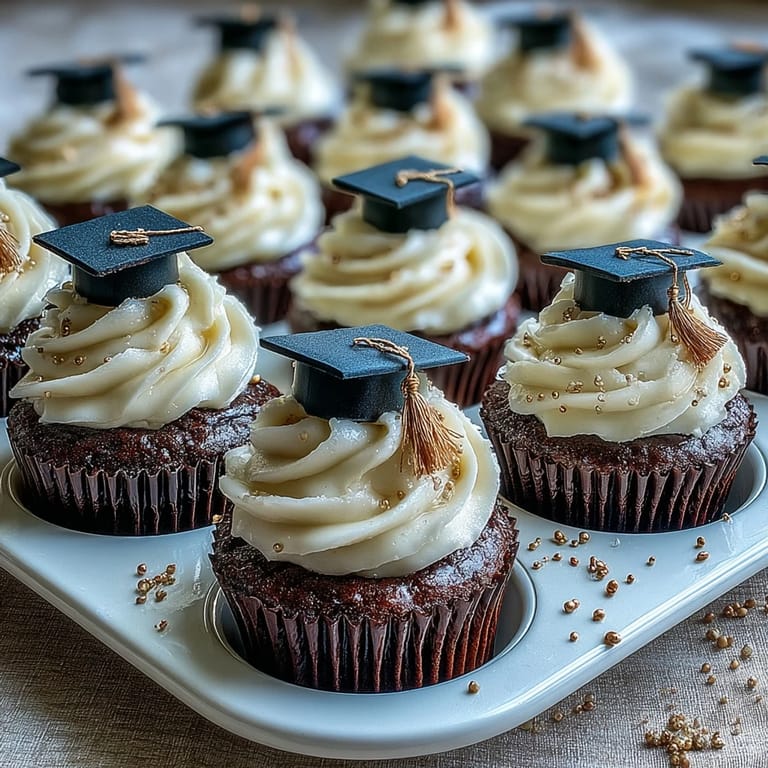
- Black fondant: It creates that dramatic graduation cap look—knead well for pliability.
- Gold fondant and edible gold dust: The gold pops against the black and signals celebration, so don’t skip it if you can find any.
- Edible adhesive or water: Only a tiny dab needed to stick shapes together; too much makes things slippery.
Tired of Takeout? 🥡
Get 10 meals you can make faster than delivery arrives. Seriously.
One email. No spam. Unsubscribe anytime.
Instructions
- Set Up for Success:
- Line your muffin tin and preheat the oven. There’s always a comforting calm in this first step, especially when cupcake liners click neatly into place.
- Mix the Dry Ingredients:
- Whisk together the flour, baking powder, and salt—feel the lightness come through your fingertips as you blend them.
- Cream & Combine:
- Cream soft butter and sugar until pale and airy; the sound of the mixer always makes this a small kitchen celebration. Add eggs one by one, letting each disappear completely before the next, then stir in that classic vanilla aroma.
- Bring it Together:
- Add dry mixture to the wet, alternating with milk. When it all comes together, stop mixing—overworking leaves cupcakes dense instead of delicate.
- Bake and Cool:
- Spoon into liners and smooth the tops—don’t fuss about perfection. Pop them in the oven; when you can smell vanilla filling the room, check for a lightly golden surface and a clean toothpick.
- Frosting Fun:
- Beat butter until creamy, then slowly add powdered sugar, milk, vanilla, and salt. Keep going until it’s cloud-light; taste with a friend, just because you can.
- Fondant Cap Crafting:
- Sprinkle cornstarch on your surface and roll the black fondant out thinly. Cut out small squares, then roll matching small balls—flatten and attach, fixing with a gentle touch and a dab of water.
- Gold Tassel Magic:
- Roll gold fondant into thin ropes and gently shape into tassels. Attach each with an extra hint of edible gold dust if you want them to sparkle under the lights.
- Decorate & Serve:
- Pipe or spread buttercream generously, then crown each cupcake with a fondant cap. Stand back and admire; offer them to guests who won’t stop smiling.
 Save
Save I’ll never forget my uncle tearing up a little as he bit into his celebratory cupcake with a gold-dusted cap. Suddenly, the kitchen felt much smaller, packed shoulder to shoulder with people whose pride and happiness made the ordinary act of baking truly special.
Make-Ahead and Storage Secrets
If there’s a busy day ahead, bake the cupcakes the night before and keep them in an airtight container—the flavor actually seems to deepen overnight. Fondant decorations hold their shape beautifully at room temperature, so assembly is breeze on the big day.
Customizing for Any Occasion
Try chocolate cupcakes for chocolate lovers or swap gold for your school colors with colored fondant—you’d be surprised how well these adapt. If someone’s dietary needs are different, replace butter and milk with plant-based alternatives for a still-delicious, vegan-friendly option.
Decorating Shortcuts and Tricks
Shaping the fondant is half the fun, but if you’re short on time, use store-bought chocolate squares for the cap tops and a string of licorice for the tassels. Even last-minute decorations can still look impressive with a confident hand and a little edible gold dust.
- Keep a slightly damp paper towel nearby to prevent fondant from drying as you work.
- Practice attaching one cap before assembling the rest to get your hand steady.
- Don’t worry if your decorations aren’t perfect—the laughter and creativity show more than any flaw.
 Save
Save Celebrate more than just a milestone—celebrate the little imperfections, the shared mess, and the sweet memories made bite by bite. Whoever receives these cupcakes will taste the effort, fun, and pride baked in every swirl and sparkle.
Recipe FAQs
- → How do I prevent fondant from sticking while rolling?
Lightly dust the work surface and rolling pin with cornstarch or a thin layer of powdered sugar. Work quickly and add small amounts of cornstarch as needed to avoid drying out the fondant.
- → Can I substitute the vanilla batter for chocolate?
Yes. Use a cocoa-enhanced batter or swap part of the flour for cocoa powder, adjusting sugar slightly. Baking time remains similar; test with a toothpick for doneness.
- → What’s the best way to keep buttercream smooth for piping?
Beat unsalted butter until pale and fluffy before gradually adding sifted powdered sugar, a splash of milk, and vanilla. Scrape the bowl frequently and beat at medium speed until glossy and pipeable.
- → How far ahead can I make the cupcakes and fondant caps?
Cupcakes can be baked a day ahead and stored in an airtight container at room temperature. Fondant caps can be made 1-2 days ahead and kept in a cool, dry place in a sealed container to avoid drying or humidity damage.
- → Any tips for adhering fondant caps to frosted tops?
Use a small dab of edible adhesive or a little water on the cap base where it meets the buttercream. Press gently and hold for a moment; avoiding excess moisture helps prevent sliding.
- → How do I make the gold tassels shine?
Roll thin ropes of gold fondant for tassels and attach to caps. Finish with a light brush of edible gold dust mixed with a drop of clear alcohol or lemon extract for an even metallic sheen.