 Save
Save I'll never forget the Halloween party three years ago when my daughter insisted we needed something scary but still kid-friendly for the snack table. I was stressed, running late, when it hit me—what if we turned a simple cream cheese dip into an actual skull? An hour later, we had created this delightfully spooky spread that became the talk of the party. Now every October, someone asks, 'Are you making the skull dip again?' and I know exactly what they mean.
The first time I made this for a Halloween gathering with neighbors, I watched a shy five-year-old point at the skull on the platter and grin wider than I'd ever seen. Her mom leaned over and whispered, 'She won't touch cream cheese dips, but look at her go.' That moment reminded me that sometimes the most ordinary ingredients become magical when you just arrange them with a little playful intention.
Ingredients
- Cream cheese (225g/8 oz), softened: This is your canvas—let it sit at room temperature for 15 minutes before mixing so it blends silky smooth without lumps. Cold cream cheese will fight you every step of the way.
- Sour cream (2 tbsp): This lightens the spread and makes it spreadable, plus it adds a subtle tang that keeps the dip from tasting one-dimensional. Don't skip it.
- Garlic powder (1 tsp): A whisper of garlic keeps things savory and balanced. It's the difference between 'nice' and 'why is this so good?'
- Lemon juice (1 tsp): This tiny amount brightens everything and prevents the spread from tasting flat or heavy.
- Salt and pepper, to taste: Taste as you go—this is where you dial in what feels right for your palate.
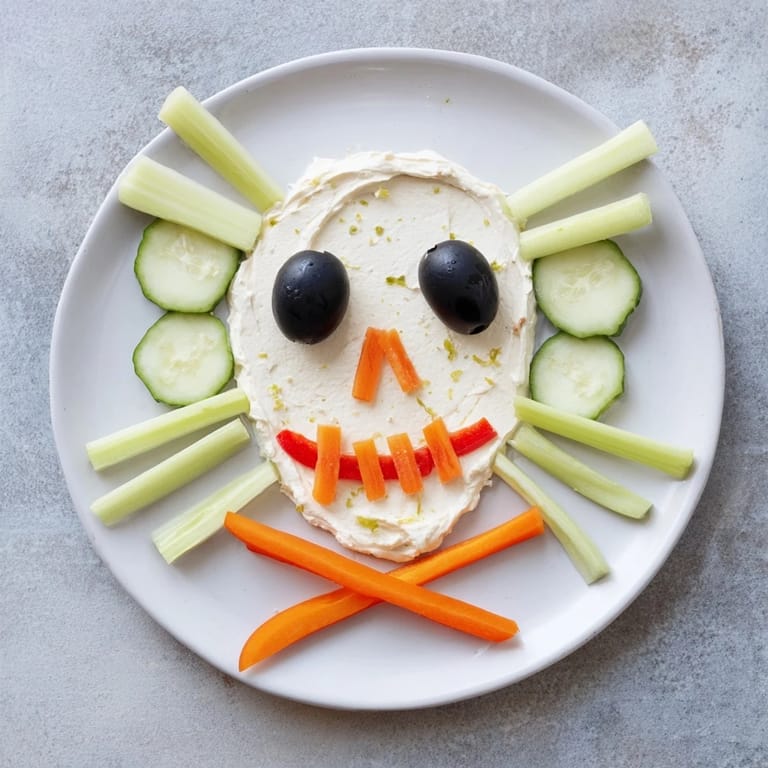
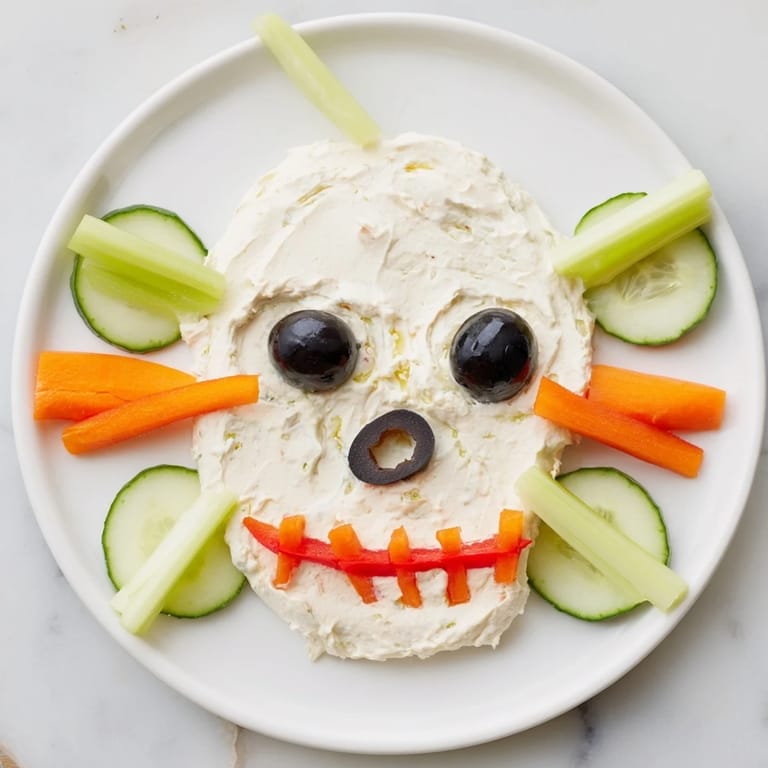
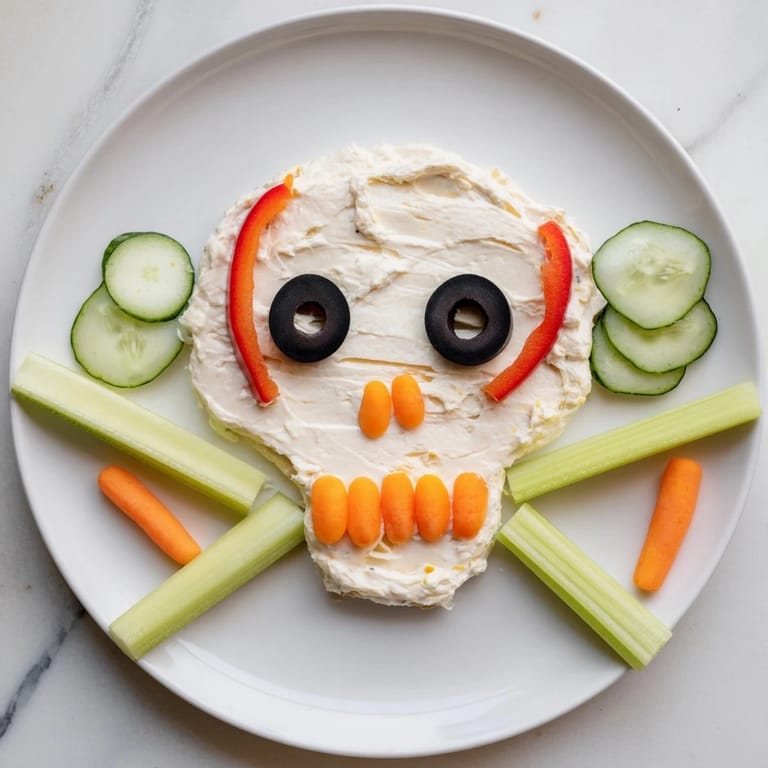
- Cucumber, sliced into rounds (1 small): The round slices become perfect details for the skull's texture. They stay crisp and add visual interest.
- Red bell pepper, cut into thin strips (1): These become the dramatic 'smile' and the bright red catches the eye immediately on the platter.
- Black olives, halved (2 large): Two perfect eye sockets—don't overthink this part. The black olives do exactly what you need them to do.
- Carrot, sliced and cut for details (1 small): Carrot rounds become teeth, and thin pieces work for the nose. You can even use carrot shavings if you want to get fancy.
- Celery sticks or breadsticks (2–4 long): These form the crossbones underneath. Celery stays firm and is truly gluten-free; breadsticks add fun texture but check the package if that matters to you.
- Fresh parsley or chives (optional): A light scatter on top adds color and a subtle herb note that feels intentional.
Tired of Takeout? 🥡
Get 10 meals you can make faster than delivery arrives. Seriously.
One email. No spam. Unsubscribe anytime.
Instructions
- Mix your creamy base:
- In a medium bowl, combine the softened cream cheese, sour cream, garlic powder, lemon juice, salt, and pepper. Use a spoon or rubber spatula and mix until it's completely smooth—no lumps, no streaks. This takes about 30 seconds if the cream cheese is truly soft. Taste it. Does it need more salt? More lemon? Now's the time to adjust.
- Shape the skull:
- Plop the entire mixture onto your large serving platter—the center is best. Using a clean spatula, gently shape it into an oval skull form. Don't stress about perfection. Smooth the surface with the back of your spatula, working the edges into a rounded head shape. Think of it like sculpting, but forgiving.
- Position the crossbones:
- Take your celery sticks or breadsticks and arrange them in an X pattern underneath and slightly overlapping the bottom of the skull. This is the scaffolding that makes people immediately say, 'Oh, I get it.' Adjust them so they feel balanced and visible.
- Create the face:
- Place the two black olive halves where eyes would naturally go on your skull shape—roughly in the upper third, spaced about 2 inches apart. Take a small piece of carrot or half an olive and position it between the eyes for the nose. Step back and look. Does the face feel centered?
- Build the mouth and teeth:
- Arrange your carrot rounds in a curved, descending line to create a 'grin' or skeletal jaw. Tuck red bell pepper strips alongside and between the carrot pieces to suggest lips and add dramatic color. A few carrot shavings can work as individual 'teeth' if you want to get detailed.
- Fill in the details:
- Use your remaining cucumber slices, carrot pieces, and vegetables to add texture and dimension around the skull's features—along the sides of the face, across the 'cheeks,' wherever it feels natural. You're not filling in every space; you're adding artistic touches that make it feel intentional.
- Garnish and chill:
- Sprinkle fresh parsley or chives lightly over the skull for a pop of green and a subtle herb note. Cover loosely with plastic wrap and refrigerate for at least 30 minutes (or up to 4 hours) before serving. This gives the flavors time to meld and keeps everything crisp and cold when guests arrive.
 Save
Save At one Halloween party, a guest who claimed to never eat 'fancy appetizers' found himself going back three times. When I asked why, he said, 'I keep forgetting it's just vegetables and cheese because I'm having too much fun with it.' That's when I realized this recipe isn't really about the ingredients at all—it's about giving people permission to play with their food.
The Art of Serving Scary Food
The magic of this skull dip isn't just in the taste—it's in the presentation. When people approach the platter, there's always a moment of recognition, often a laugh, sometimes a delighted gasp. The platter becomes a conversation starter. You can serve it on a white or black plate to make the skull pop, or nestle it on a bed of dark green arugula to make it feel more dramatic. I once served mine on an orange platter and it looked like a Halloween centerpiece all on its own. Trust that people will engage with something this playful.
Customizing Your Skull for Dietary Needs
One of my favorite things about this recipe is how naturally it adapts. For a vegan version, swap the cream cheese and sour cream for dairy-free alternatives—they work beautifully and nobody will notice the difference. For gluten-free, skip the breadsticks and use just celery, which honestly looks more authentically spooky anyway. I've even made a version with herbed cream cheese by folding in fresh dill and chives, which elevated it beyond the basic recipe and got compliments all night. The skeleton bones are the structure; everything else is your creative canvas.
Making It Ahead and Storage Tips
You can prepare the cream cheese base up to 24 hours in advance—mix it, shape it, cover it loosely with plastic wrap, and refrigerate. The vegetables should be prepped and stored separately in containers so they stay crisp. About 30 minutes before guests arrive, position the bones and arrange the vegetables. This approach takes the stress out of party prep and ensures everything tastes and looks its absolute best. Leftovers keep for about two days if you store them in an airtight container, though honestly, there are rarely leftovers.
- Prep the cream cheese base the day before to save yourself time on party day
- Keep cut vegetables in separate containers with damp paper towels to maintain crispness
- Arrange the skull's features no more than 30 minutes before serving for maximum visual impact
 Save
Save This is the kind of recipe that reminds us food is meant to be fun and memorable. Every time you serve it, you're not just offering an appetizer—you're inviting people to smile.
Recipe FAQs
- → What ingredients create the creamy base?
The creamy base is made by blending softened cream cheese with sour cream, garlic powder, lemon juice, salt, and pepper until smooth.
- → How are the skull features decorated?
Slices of cucumber, black olive halves for eyes, carrot pieces for nose and teeth, and red bell pepper strips are arranged to form skull features.
- → Can this be adapted for gluten-free diets?
Yes, simply use celery sticks instead of breadsticks to keep the spread gluten-free.
- → What is the best way to serve the spread?
Chill the spread and serve on a large platter with crackers, pita chips, or vegetable dippers alongside.
- → Are there garnish options to enhance flavor?
Fresh parsley or chives can be added as garnish to complement the flavors and presentation.